- Description:
- Specs:
- FAQs
- Seed Storage Tips:
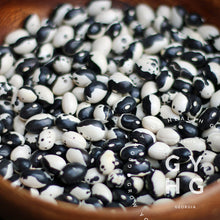
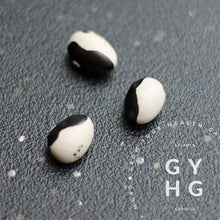
This Calypso is an heirloom bush bean originating from Mexico and claims to originate from a 400-old heirloom bush bean variety with black and white markings like the Orca or Ying-Yang Bean, but these beans are larger and a bit earlier. When young, the pods can be harvested as a green bean, but when full-grown, they can be used as a bean for drying.
Beans will double in size when cooked. Creamy, plump texture, and smooth mild flavor: 1 cup dried beans = 2 ¼ cups cooked beans. Soak overnight before cooking. Note: Cooking Calypso beans are a member of the kidney bean family and in large quantities of water help maintain their distinctive coloring. Calypso beans can be combined with rice to make a unique stuffing for vegetables and are excellent in Poblano stew, or in a cold bean salad with mango and citrus. Makes for a conversation piece at your holiday gatherings or cookouts.
• Heirloom Bush Bean Variety
• Hydroponic Growers: Plant 1-2 seed(s) p/ 1.5” rock wool cube
• Grow outside, full sun, during the warm season (nightly temps above 65ºF)
• Can be grown inside under grow lights (with temps above 70ºF)
• Seed has been tested for ideal germination
• Open Field
• 90 Days to Maturation
• Approximately 30 beans p/pkg
Grow your health gardening with these super fun and great tasting beans!
Q: What does "Hydroponic Seeds" or "Hydroponically Adapted" in the product description mean?
A: Approximately eighty percent (80%) of all our seed stock is grown hydroponic systems, so we identify these seeds primarily for the benefit of our hydroponic home-growers. These plants are grown in a hydroponic system and get the optimal nutrients they need with the right amount of water at the proper pH, lighting, and temperature which ultimately gives us strong seed stock. This just means our seed is especially well-adapted for hydroponic growing conditions, but know this hydroponic-adapted seed will also grow just as well in soil. If hydroponic is not noted in the product description, the plant that seed came from was grown in rich organic soil with beneficial micro-nutrients and kelp using organic growing practices.
Q: How do seeds come packaged?
A: Most of our seeds are sent to you in moisture-resistant resealable polybags and sized for the amount of seed packaged. This method of storage keeps seeds protected from humidity and moisture in transport as well as in your home environment. In using these durable bags, we are helping to ensure seeds stay at their peak longer and make things easier for you as the grower.
How should I store my seeds to maintain a healthy germination rate?
There are two main factors that influence the ageing of seeds that are stored: moisture and temperature. Know that every seed has a lifespan and will vary by cultivar, but with some basic good practices you can significanly prolong the life of your seed and protect your investment with a few best practices:
1. Seed Packet Needs to be Sealed: If you open your seed packet to plant, be sure you reseal using the provided closure, pushing out any extra air in the process of re-sealing your seed packet. Your seed packet has been intentionally chosen to help limit air and moisture.
2. Selecting your Seed Storage Container: The goal of whatever "container" you choose is to idealy limit moisture and UV light exposure which can reduce germination rates over time. Use a clean and dry glass jar (we like to use an amber colored wide-mouth Mason Jar) with a lid that closes tightly that is large enough to hold several seed packets. Using a cotton ball and rubbing alcohol, wipe down inside of glass jar and allow to completey dry. This step will help to kill any bacteria or fungi residue that could be present on the surface of your jar (especially if your jar has been sitting in storage for awhile).
If you have a food preservation system like a vacuum sealer system or a canister that can seal with a vacuum like this, these work well also — just keep in mind that if you have to access your seed supply, you will have to cut the package open and reseal to put back into storage.
3. Add a Humidity Indicator Card: We also recommend you consider a humidity indicator card to slip into your glass jar. These are the ones we use and are available for sale in our shop if you want to add them to your seed storage container. Moisture has a direct effect on encouraging fungi growth — especially when in a warmer environment.
4. Remove Air within Sealed Jar: If you are using a vacuum sealed container or bag, you won't need to do this step, but if you're using an amber jar, we also recommend using some sort of oxygen asorber. Two types we like to use are dissecant packet or a couple dried balls of clay. We simply drop one new dissecant packet or a couple of dried balls of clay to the bottom of our jar before sealing tightly with a lid. Both the dissecant and the dry clay ball will help absorb any moisture that may be inside your container at the time of sealing and prolong the germination of your seed.
5. Place Seeds in Sealed Jar in Cool Place: Lastly, temperature plays a key role in preserving your seeds. According to the Harrington rule of thumb, for each rise of one percent (1%) of moisture and for each rise of 5ºC / 41ºF in storage temperature, the storage life of seeds is halved (Harrington, 1972).
We recommend you put your sealed seed packets, along with an oxygen absorber, into some sort of sealed container and place into the refrigerator immediately after you are finished planting. Do not let them sit out and especially keep them out of the hot sun while planting outdoors. Seeds begin to die at temps at above 108ºF and if at even a bit lower hot temp if constistently left in warmer temp for a long period of time. This is also why we don't recommend purchasing seed during summer months as shipping containers are not always air conditioned and high heat can damage seeds during shipping transit. Seeds need to stay cool to maintain germination rates. We never put our seed orders in hot mail boxes or mail drop boxes outside as these are literal ovens and will cook seed during summer months. If you're taking the risk of ordering seed during the months of June, July, August or even early September, you are taking the risk of damaging your seed with heat and shortening the life of your purchased seed.
The International Board of Plant Genetic Resources recommends for long-term storage that seeds be stored long-term -20ºC / -4ºF and 5 percent moisture content. Most of us don't have a way to chill seeds down to this low of temp, but we can get close. By placing your seeds in a sealed container with oxygen absorber of some sort and into your freezer, you can significantly prolong the life of your seed inventory. One word of caution though using this storage method—when removing your seeds from the freezer, be patient before accessing. You'll want to bring the container to room temp before opening and using the seed. When you're finished using your seed, follow the recommended steps above and return seed to freezer (sealed amber container with oxygen absorber) for long-term storage.
6. Some seed has a shorter shelf-life span than others. The rate of deteriation varies from one cultivar to another, so you'll want to annually test your seed and plant out before germination rates decline. We recommend you test in October to the end of December for viability. Knowing what seed is still usable will alert you to what needs to be replaced or planted in the coming spring and seed suppliers typically start running out of varities in mid-February, so it's good to know what you'll need well before then and order early.
7. Keep a record of your inventory. Before tucking seeds away into cool storage, it's a good idea to either write down what seed packets (and year purchased) in your gardening journal or in an Excel spreadsheet. When winter comes, you'll have a quick reference when shopping for new varieties you would like to try and know (without having to disturb your seed bank) what you already have in inventory.


