- Description:
- Seed Starting:
- FAQs
- Seed Storage Tips:
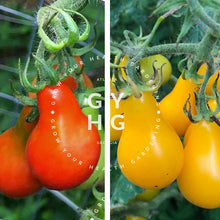
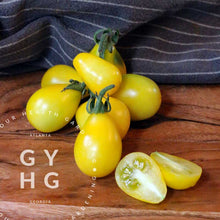
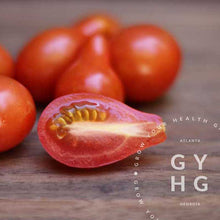
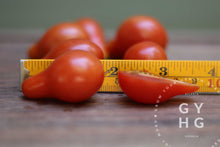
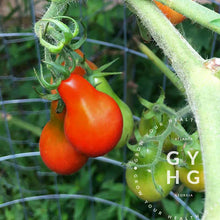
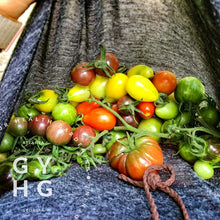
The Yellow and Red Fig Pear Heirloom Cherry Tomato are an old rare heirloom variety dating back to 1850s when it was originally sold by The David Landreth Seed House of Philadelphia. (1) This variety was often dried in the sun / dehydrated and used as a preserved winter food source. It is a versatile cherry tomato variety producing abundant yields. The parent plant of these seeds comes from an organic Amish grower and have been grown in a hydroponic environment. This seed is ideal for growing in a hydroponic or aeroponic system such as the vertical Tower Garden FLEX or Farm Stand with a trellis support to the side. It would also do well in a Bato Bucket system with either vertical or side support as vines get 5-6' long. Final fruit size is around an inch-and-a-half (1½"" inches) and pear shaped (see photo).
Plant Specs:
• Name: Red and Yellow Fig Pear Cherry Tomato | Solanum lycopersicum
• Type of Cultivar: Indeterminate Heirloom Cherry Tomato Variety
• Breed: Open Field and Hand Pollinated
• Fruit Shape: Small Pear
• Days to Maturity: approx. 58
• Epigenetic Growing Conditions of Parent Plant (Parentage DNA):
• Hydroponic-Adapted Seed: will grow in soil, but especially ideal for Hydroponic, Aeroponic, Aquaponic growing conditions.
• Grown using organic growing practices on our farm including beneficial biological foliar teas.
• Quantity: Approximately 12 seeds p/packet. Seed has been fermented to reduce potential for disease as well as recently tested for ideal germination and results will be provided on seed label.
Click "Seed Starting" tab above for recommended Seed Starting Instructions
• Seed Starting Tips:
• There's a "sweet spot" for starting tomato seedlings. With a little pre-planning and marking your calendar, you can be ready to start your seedlings and be set up for success.
• We can often get too eager and start seeds too early, only for young seedlings to run out of options to tap nutrients before they hit their growth spurt before entering into the flowering stage. We recommend waiting to start seed indoors 8 weeks prior to your last average frost as well as timing it to transplant when nightly temps are consistently above 65ºF.
Step 1: To find your average nightly temps, visit here.
(TIPS: To select your city, type your city in search bar in the top right of your screen when viewing Web site from a desktop computer. To turn off distracting ads, click lower right text link that reads "Hide Ads".)
Step 2: To find your average last frost date, visit here.
• We recommend starting seed between two pieces of clean paper towel sheets, moistened with non-chlorinated water. Place seed between wetted paper towel sheets in a sealed container like a Tupperware with lid, glass jar with lid, or sealed Ziplock bag. Keep moistened seed in-between paper towel between 72º-75ºF at a constant for 5-10 days. Check each day for germination (root will emerge from seed casing). Be patient, some seeds can take 7-15 days to germinate depending on conditions.
• Once you see the root emerge from the seed casing, ever-so-gently move the seed with root emerging to soil or Rockwool and continue growing on heat mat while keeping seed moist (but not drenched). Place seed in soil/rockwool onto a heat mat with thermostat control set between 72ºF-75ºF and give bright grow / UV lights. Place a small fan in the area for air movement.
• Hydroponic Growers: Plant 1 seed p/ 1.5” rock wool cube.
• Soil Growers: Plant 1 seed p/ cell and lightly cover with 1/8" soil.
• After danger of frost, slowly move your seedling from heat mat and UV lights to the outdoors. Introduce seedling to outdoors during the day when daytime temps are about 65ºF to acclimate seedling for 1 week prior to transplanting.
• Grow Outside: full sun, during the warm season (nightly temps above 65ºF)
Q: What does "Hydroponic Seeds" or "Hydroponically Adapted" in the product description mean?
A: Approximately eighty percent (80%) of all our seed stock is grown hydroponic systems, so we identify these seeds primarily for the benefit of our hydroponic home-growers. These plants are grown in a hydroponic system and get the optimal nutrients they need with the right amount of water at the proper pH, lighting, and temperature which ultimately gives us strong seed stock. This just means our seed is especially well-adapted for hydroponic growing conditions, but know this hydroponic-adapted seed will also grow just as well in soil. If hydroponic is not noted in the product description, the plant that seed came from was grown in rich organic soil with beneficial micro-nutrients and kelp using organic growing practices.
Q: How do seeds come packaged?
A: Most of our seeds are sent to you in moisture-resistant resealable polybags and sized for the amount of seed packaged. This method of storage keeps seeds protected from humidity and moisture in transport as well as in your home environment. In using these durable bags, we are helping to ensure seeds stay at their peak longer and make things easier for you as the grower.
Q: Did you know that Tomatoes made the EWG's Dirty Dozen List and was number 10 on the list in 2020?
Grow your own tomatoes from seed and keep your body safe from unnecessary pesticide exposure! We show you how to grow tomatoes on the Grow Your Health Gardening web site.
Q: What does "indeterminate", "semi-determinate", and "determinate" variety mean?
A: These descriptors refer to how tall or long the tomato plant will vine. It helps to know because they behave differently in growth habit and fruiting patterns.
• "Indeterminate" indicates that the tomato variety will grow to an undetermined length. It will grow length to the vine continuing to set fruit throughout the season on sections of new growth. These tomatoes need a lot of support to handle vines that can grow up to 10'-12' in some seasons. They also tend to produce fruits throughout the growing season.
• "Determinate" indicates that the tomato variety will grow to a determined length and reach maturity after a determined length of time, setting fruit typically all at one time and then be done. This variety type can have a thicker main stem which helps to support the weight of the plant and usually requires no or minimal staking.
• "Semi-determinate" refers to a tomato variety that is a mix of both—it will grow to a certain point, put on a flush of fruit, but (with proper pruning especially) continue to grow suckers and vine to produce more fruit before fading and stopping all growth and fruit production. This variety type will need some support.
Q: What do the abbreviations mean next to "Tomato Disease Tolerance"?
A: Known disease tolerance or resistance is indicated in parentheses after the variety name. V, F, and N at the end of a variety name indicate known resistance to verticillium wilt, fusarium wilt, and nematodes, respectively. Many factors affect disease resistance and results may vary from region to region and from season to season. Disease resistant varieties will not be totally disease-free but they will resist or tolerate disease better than other varieties. Note that many heirloom tomatoes have not been extensively tested for disease tolerance either in the laboratory, or in extensive field trials - absence of disease resistance information in the variety description does not imply lack of resistance.
| ab = Alternaria (early blight) | fw2 = Fusarium wilt, race 2 |
| asc = Alternaria stem canker | gw = Gray wall |
| an = Anthracnose | gls = Gray leaf spot |
| ber = Blossom end rot | lb = Late blight |
| bw = Bacteria wilt | nhr = Nail head rust |
| cf = Cat facing | rkn = Root knot nematode |
| clm = Cladosporium leaf mold | st = Stemphylium spot |
| cr = Crack resistance | sun = Sun scald |
| cs = Crease stem | tmv = Tobacco mosaic virus |
| fw1 = Fusarium wilt, race 1 | vw = Verticillium wilt |
How should I store my seeds to maintain a healthy germination rate?
There are two main factors that influence the ageing of seeds that are stored: moisture and temperature. Know that every seed has a lifespan and will vary by cultivar, but with some basic good practices you can significanly prolong the life of your seed and protect your investment with a few best practices:
1. Seed Packet Needs to be Sealed: If you open your seed packet to plant, be sure you reseal using the provided closure, pushing out any extra air in the process of re-sealing your seed packet. Your seed packet has been intentionally chosen to help limit air and moisture.
2. Selecting your Seed Storage Container: The goal of whatever "container" you choose is to idealy limit moisture and UV light exposure which can reduce germination rates over time. Use a clean and dry glass jar (we like to use an amber colored wide-mouth Mason Jar) with a lid that closes tightly that is large enough to hold several seed packets. Using a cotton ball and rubbing alcohol, wipe down inside of glass jar and allow to completey dry. This step will help to kill any bacteria or fungi residue that could be present on the surface of your jar (especially if your jar has been sitting in storage for awhile).
If you have a food preservation system like a vacuum sealer system or a canister that can seal with a vacuum like this, these work well also — just keep in mind that if you have to access your seed supply, you will have to cut the package open and reseal to put back into storage.
3. Add a Humidity Indicator Card: We also recommend you consider a humidity indicator card to slip into your glass jar. These are the ones we use and are available for sale in our shop if you want to add them to your seed storage container. Moisture has a direct effect on encouraging fungi growth — especially when in a warmer environment.
4. Remove Air within Sealed Jar: If you are using a vacuum sealed container or bag, you won't need to do this step, but if you're using an amber jar, we also recommend using some sort of oxygen asorber. Two types we like to use are dissecant packet or a couple dried balls of clay. We simply drop one new dissecant packet or a couple of dried balls of clay to the bottom of our jar before sealing tightly with a lid. Both the dissecant and the dry clay ball will help absorb any moisture that may be inside your container at the time of sealing and prolong the germination of your seed.
5. Place Seeds in Sealed Jar in Cool Place: Lastly, temperature plays a key role in preserving your seeds. According to the Harrington rule of thumb, for each rise of one percent (1%) of moisture and for each rise of 5ºC / 41ºF in storage temperature, the storage life of seeds is halved (Harrington, 1972).
We recommend you put your sealed seed packets, along with an oxygen absorber, into some sort of sealed container and place into the refrigerator immediately after you are finished planting. Do not let them sit out and especially keep them out of the hot sun while planting outdoors. Seeds begin to die at temps at above 108ºF and if at even a bit lower hot temp if constistently left in warmer temp for a long period of time. This is also why we don't recommend purchasing seed during summer months as shipping containers are not always air conditioned and high heat can damage seeds during shipping transit. Seeds need to stay cool to maintain germination rates. We never put our seed orders in hot mail boxes or mail drop boxes outside as these are literal ovens and will cook seed during summer months. If you're taking the risk of ordering seed during the months of June, July, August or even early September, you are taking the risk of damaging your seed with heat and shortening the life of your purchased seed.
The International Board of Plant Genetic Resources recommends for long-term storage that seeds be stored long-term -20ºC / -4ºF and 5 percent moisture content. Most of us don't have a way to chill seeds down to this low of temp, but we can get close. By placing your seeds in a sealed container with oxygen absorber of some sort and into your freezer, you can significantly prolong the life of your seed inventory. One word of caution though using this storage method—when removing your seeds from the freezer, be patient before accessing. You'll want to bring the container to room temp before opening and using the seed. When you're finished using your seed, follow the recommended steps above and return seed to freezer (sealed amber container with oxygen absorber) for long-term storage.
6. Some seed has a shorter shelf-life span than others. The rate of deteriation varies from one cultivar to another, so you'll want to annually test your seed and plant out before germination rates decline. We recommend you test in October to the end of December for viability. Knowing what seed is still usable will alert you to what needs to be replaced or planted in the coming spring and seed suppliers typically start running out of varities in mid-February, so it's good to know what you'll need well before then and order early.
7. Keep a record of your inventory. Before tucking seeds away into cool storage, it's a good idea to either write down what seed packets (and year purchased) in your gardening journal or in an Excel spreadsheet. When winter comes, you'll have a quick reference when shopping for new varieties you would like to try and know (without having to disturb your seed bank) what you already have in inventory.


